
‘Antimalware Service Executable’ (MsMpEng.exe) is a core component of Windows Defender, which is responsible for real-time protection against malware on Windows systems. However, it can sometimes cause high CPU usage, leading to system slowdowns. If you’re experiencing high CPU usage due to this process, here are several methods you can use to fix or mitigate the issue.
1. Change Windows Defender’s Scheduled Scans
One of the most common reasons for high CPU usage by Antimalware Service Executable is that it’s performing a scan. You can adjust its scan schedule to run during times when you are not using the computer.
Steps:

- Open Task Scheduler:
- Press
Windows + R, typetaskschd.msc, and hit Enter.
- Press
- Navigate to Task Scheduler Library > Microsoft > Windows > Windows Defender.
- In the right panel, find Windows Defender Scheduled Scan.
- Right-click and select Properties.
- Go to the Conditions tab and uncheck the options under Idle, Power, and Network. This prevents the scan from running when you’re using your computer.
- Set a specific time for the scan under the Triggers tab when your PC is less likely to be in use.
2. Disable Real-Time Protection
If Windows Defender’s real-time protection is consuming too many resources, you can temporarily disable it. However, this could leave your system vulnerable, so be sure to re-enable it or use another antivirus program.
Steps:
- Open Windows Security:
- Press
Windows + Ito open Settings, then go to Update & Security > Windows Security.
- Press
- Click Virus & Threat Protection.
- Select Manage settings under Virus & threat protection settings.
- Turn off Real-time protection.
Note: Disabling this will reduce CPU usage but can expose your system to threats, so this should only be a temporary fix.
3. Exclude Windows Defender from Scanning Its Own Directory
Windows Defender can sometimes end up scanning itself, leading to high CPU usage. You can prevent this by excluding its own folder from being scanned.
Steps:
- Open Windows Security:
- Go to Virus & Threat Protection > Manage settings.
- Scroll down and click Add or remove exclusions.
- Click Add an exclusion, then select Folder.
- Navigate to: C:\Program Files\Windows Defender
This prevents Windows Defender from scanning its own folder, which can reduce CPU usage.
4. Limit Windows Defender’s CPU Usage via Group Policy
You can limit the amount of CPU that Windows Defender uses during scans using Group Policy (for Windows Pro/Enterprise users) or through a Registry tweak (for Windows Home users).
Via Group Policy (for Pro/Enterprise):
- Open Group Policy Editor:
- Press
Windows + R, typegpedit.msc, and hit Enter.
- Press
- Navigate to:
Computer Configuration > Administrative Templates > Windows Components > Microsoft Defender Antivirus > Scan - Find Specify the maximum CPU usage during a scan.
- Enable the setting and set the CPU usage limit (e.g., 50%).
Via Registry Editor (for Home):
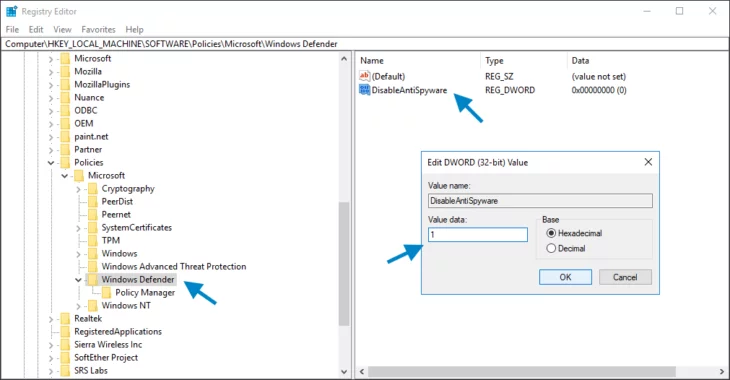
- Open Registry Editor:
- Press
Windows + R, typeregedit, and hit Enter.
- Press
- Navigate to:
HKEY_LOCAL_MACHINE\SOFTWARE\Policies\Microsoft\Windows Defender\Scan - Create a new DWORD (32-bit) Value named
AvgCPULoadFactor. - Set the value to the percentage of CPU you want to allow (e.g., 50 for 50%).
5. Use Third-Party Antivirus
If the high CPU usage persists and is interfering with your work, consider using a third-party antivirus solution. Some alternative antivirus programs are lighter on system resources than Windows Defender.
Steps:
- Install a trusted third-party antivirus program such as Avast, Bitdefender, or Kaspersky.
- Disable Windows Defender:
- After installing the new antivirus, Windows Defender should automatically disable itself. If it doesn’t, follow these steps:
- Go to Windows Security > Virus & threat protection and disable Real-time protection.
6. Update Windows and Drivers
Sometimes, high CPU usage by Antimalware Service Executable can be due to an outdated version of Windows or drivers.
Steps:
- Update Windows:
- Go to Settings > Update & Security > Windows Update and check for updates.
- Update drivers:
- Go to Device Manager (press
Windows + X, then choose Device Manager), and check if any drivers need updating.
- Go to Device Manager (press
7. Upgrade Your Hardware
If none of the above solutions work and you frequently experience high CPU usage from system processes, it might be time to consider upgrading your hardware, particularly the CPU or memory. However, this is usually a last resort for older systems.
Conclusion
The Antimalware Service Executable high CPU usage issue can be frustrating, but with the steps outlined above, you should be able to manage it effectively. Whether it’s scheduling scans for non-peak times, disabling real-time protection temporarily, or limiting CPU usage via Group Policy, there are several ways to reduce the impact on your system performance. If Windows Defender continues to be problematic, you might want to explore third-party antivirus options.